Monthly Archives: February 2016

You are browsing the site archives by month.

Hawaiian Food Trip: Oahu: Part 1 (Pearl Harbor)

Taro Milk Tea, Fried Calamari, Takoyaki

We will commence our Hawaiian Food Trip with a direct 10-hour flight from Toronto to Honolulu with Air Canada which lands us in Honolulu at 9:15 PM (Hawaii-Aleutian Standard Time). With a small flight delay, a missing car seat (the airport gave us a brand new car seat to keep due to the airline’s transporting issues) and by the time we gather our luggage, get our rental car and drive to our condo, it’s past 11:00 PM. I actually packed a tetra box almond milk in our checked luggage and brought my homemade banana muffins in one of our carry-ons so that the next day we don’t have to scramble around looking for breakfast.

With three kids, you just can’t freestyle travel. We planned ahead and pre-bought and pre-booked some activities. I would suggest to plan at least one major activity for the day and if you have time, plan others as backups but manoeuvre them as needed once you get there. If you’re a Canadian planning to visit some of the major attractions in Oahu and if you’re a Costco member (once again, I’m not being paid by Costco but this is really a great deal!), then go get yourself a Go Oahu® 4-day Card. It’s a great deal and if you pick a couple of major places to visit, you get your money’s worth. Plus, we pay Canadian prices for the Go Card online, which is a bonus.

Before planning every trip, I always ask friends to recommend places to visit, where to eat, and any other helpful tips. We were also lucky that we have Canadian friends living in Honolulu and they hosted a nice family dinner for us 🙂 She also recommended places to check out and restaurants to eat – it was helpful to have a local’s perspective. I told her she should be a tour guide expert for Canadian tourists!

Pearl Harbor

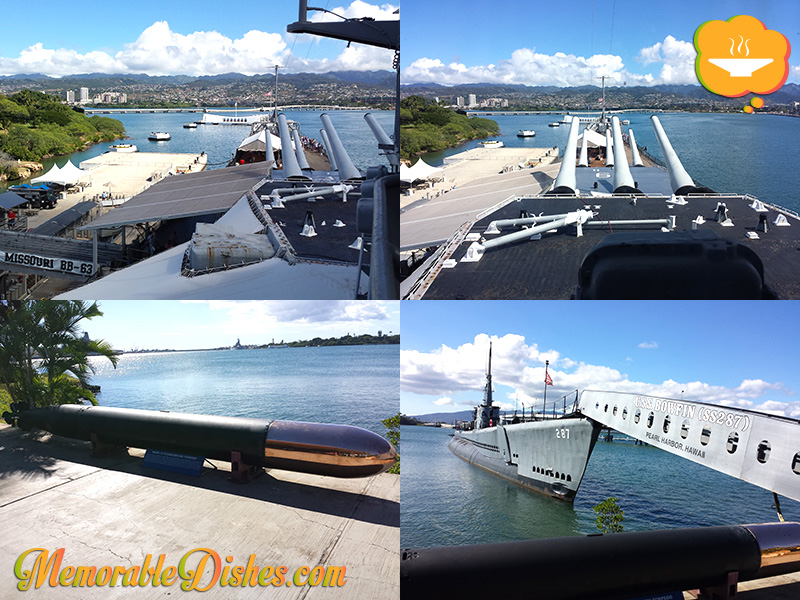
People who have been to Pearl Harbor would probably tell you that you cannot spend the whole day there. Very true unless you’re travelling with small children. We got there around 8:45 AM and left there around 4 PM. Start your tour with USS Arizona Memorial and get there early (they open at 7:00 AM) because the National Park Service gives out over 1,300 free walk up tickets each day on a first come, first serve basis. We were lucky that we got to go to the 9:00 AM tour and on we went. By the time it was finished, it was 10:30 ish. Even though it was only almost 11:00 AM, the kids were hungry. Luckily there was an outdoor food area on the premise. I’m usually not crazy about the food at tourist sites. They’re usually not the greatest so I was very surprised to find their hot dogs came with complimentary cheese and chili sauce. They also sold soups there too! Again, I was a bit skeptical especially because the soups were served in paper coffee cups. But the clam chowder and corn chowder were piping hot and surprisingly delicious. (Notice I forgot to take photos of these food items. I think my hand would’ve been bitten off if I took photos of the hot dogs and soups while my famished children looked on 😛 .)

After the animals, I mean, children were fed, we proceeded to visit the Battleship Missouri Memorial and Pacific Aviation Museum. You’ll need to take a complimentary shuttle to get there once you buy your tickets. Everything is clearly labelled and there are lots of people to ask questions if you get confused. When we got back to the main site, we checked out the USS Bowfin Submarine and museum. The kids, including our toddler girl had fun playing battleship control inside the museum. It was almost closing time so hardly anyone was there and they got to spend lots of time running around.

Pearl Harbor

Pearl Harbor

Tips for visiting Pearl Harbor

You cannot bring backpacks, not even diaper bags when visiting any of the Pearl Harbor historic sites. A great tip I read was to bring several clear large zip loc bags. I put all the baby essentials in the clear bags. (It was actually very liberating not having to carry so many things.) I had my pockets to put my wallet and cell phone.

Also, kids under 4 cannot go into the submarine but are allowed in the museum. So my husband and I took turns watching our toddler. After my husband came back with the boys, they allowed me to take the boys onto the submarine again, which was very nice.

Papa’s Tea House

Part of our Hawaii trip planning involved deciding where to eat. I am so happy now that we have Yelp, so we can pick and review the restaurants beforehand. I remember going to Santorini, Greece pre-Yelp days and we had to rely on outdated travel book restaurant reviews. One seaside restaurant had the audacity to tell us that they didn’t serve octopus! I thought to myself, their restaurant was right by the sea! As you could tell, it was one of those tourist trap restaurants. Meanwhile, we happened to discovered a neighbourhood restaurant (not by the sea) and they served the most delicious octopus and other great foods.

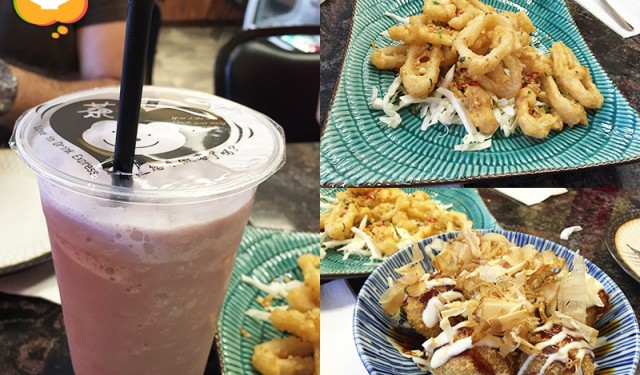
When I was searching, I tried to find Hawaiian style food that we normally can’t eat back home. I found this restaurant called Papa’s Tea House in Aiea which is five minutes away from the Pearl Harbor memorials. This restaurant is located in an ubiquitous suburban plaza. We ordered fried calamari (requested by the boys), takoyaki, spicy ahi don, pork katsu curry, seafood combo laksa and a large taro milk tea to share. Once again I forgot to take pics of the pork katsu and laksa because of my famished children.

Taro Milk Tea, Fried Calamari, Takoyaki

Taro Milk Tea, Fried Calamari, Takoyaki

Taro Milk Tea – Let me tell you it was the BEST taro milk tea ever! They actually use real taro and not powder.

Fried Calamari – Love the garlic and chili sprinkled on top.

Takoyaki – Crunchy on the outside and perfectly moist on the inside.

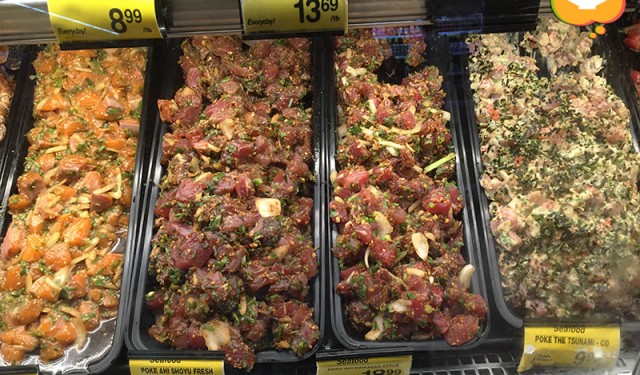
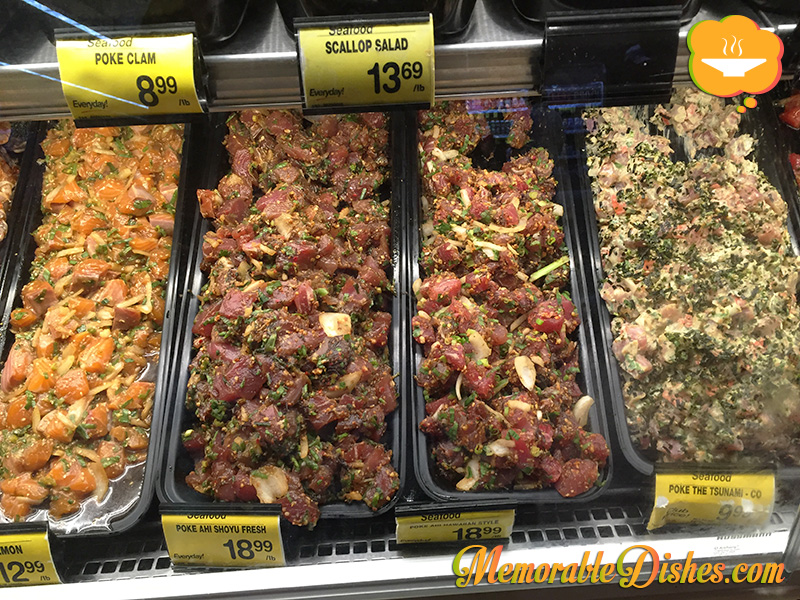
Spicy Ahi Don – Basically spicy tuna poke on top of rice. Poke was my addiction while I was in Hawaii and of course it was delicious.

Pork Katsu Curry – Pork cutlet was delicious. However, the curry didn’t taste like the Japanese curry I’m used to but almost like a Chinese curry.

Seafood Combo Laksa – Was OK but not very authentic. The taste of the broth wasn’t as complex compared to what I’m used to.

Stay tuned for Hawaiian Food Trip: Oahu: Part 2 in my next post for more Hawaiian Memorable Dishes!

Hawaiian Food Trip: Aloha!

Variety of Poke

Travelling with three kids is no easy feat. And feeding them is a whole other ordeal. Luckily my kids love to eat and they usually eat everything my husband and I do. We recently travelled to Hawaii (Oahu and Maui islands) and decided to rent condos because we found it more economical and easier with young kids. We prepared meals at the condo and the kids had more room to run around. As much as my kids love eating out, I know they would get sick of eating out everyday, three meals a day.

Coming from a food-obsessed family, I researched what and where to eat in Hawaii before I left. (When our family visits from the States, we discuss what to eat for dinner immediately after our bellies are full from eating lunch. Yes, our family loves to eat!) I even mapped out the closest restaurants in the area we stayed at and all the areas we were visiting. Not only did I read restaurant reviews, I also read reviews on which grocery stores were better in terms of size, variety of foods sold and prices. Perhaps, I did more research on food-related places than the places we visited? 😛

During our trip to Oahu and Maui, we hit Costcos on both islands plus a couple of grocery stores to feed our family. You might be thinking I’m getting paid by Costco to write this post – I’m not! Food is expensive in Hawaii and I found if you have to get some things in bulk, Costco is the way to go. Even if you’re Canadian, you can use your membership in the US.

One of the most Memorable Dishes I had was poke. I was so excited when I read about it and couldn’t wait to try it. Poke is basically a raw fish salad that’s mixed with seasonings. The traditional poke is made with tuna, soy sauce, sea salt, maui onions and a few other ingredients. I bought poke from different grocery stores and had some at restaurants too. I am the only one that went crazy over poke. My husband had a bit and only enjoyed the spicy version of it and the kids didn’t like it at all (not a surprise).

Variety of Poke

Variety of Poke

There were so many interesting food products in Hawaii. One of the things we found at the grocery store was taro buns. I should’ve taken a photo of the inside of the bun because it’s purple! I couldn’t really taste the taro in the bun but it was really cool to find food items you normally wouldn’t find in your own area. I also bought pineapple wine from the grocery store to try. It was a bit on the sweeter side and the taste was OK. I guess liking certain wine is subjective. But it was interesting to try something local from the area.

Taro Buns and Pineapple Wine

Taro Buns and Pineapple Wine

How could I forget about Spam? Hawaii is Spam haven! I couldn’t believe how many different variety and flavours of Spam they had at the grocery store. I was tempted to buy every flavour from the Spam wall and bring them home!

Spam Wall

Spam Wall

One thing I didn’t get to try in Hawaii was Spam Musubi. It’s basically Spam on top of rice wrapped in seaweed. Every place that sold Spam Musubi had it heated under a food lamp in a glass food display case. I was weary of buying something that was sitting there for hours looking like no one was buying them. I could easily create this Memorable Dish at home.

Hope this post piqued your interest in Hawaiian foods. For now, this concludes the introduction of our Hawaiian Food Trip. In the next few posts, I will write about some of our travel and food adventures in Hawaii. Take a journey with me, as I highlight some of the memorable places we visited and the Memorable Dishes we tasted.

Thousand Island Shrimp (千島蝦)

Thousand Island Shrimp

Thousand Island Shrimp – how can I forget this Memorable Dish? It’s not only one of my favourite from my uncle, who is a professional Cantonese cuisine chef, but it’s all my brothers’ and my Canadian cousins’ favourite too! My cousins could be impartial because my uncle is their dad 😉

I just love eating this crunchy on the outside and juicy and tender on the inside shrimp smothered with semi-secretive thousand island sauce.

Every time we went to the restaurants my uncle has worked at, we would order this dish. Sometimes it wasn’t even on the menu but if we requested it, he would cook it for us. There were times when we were expecting to have this yummy shrimp dish but my family didn’t order it. The parents would say, “Always the same dish! Try something different!” But we love it and just have to have it. It’s almost like an addiction! I’m thinking about it as I’m writing this and realize we haven’t had it in awhile! I need to have my dose of thousand island shrimp now!

My mom had made this dish at home so I inquired about the recipe for the homemade version. You can never compare nor re-create Cantonese restaurant dishes properly from home because you don’t have the crazy fiery wok to cook from. People always think Chinese food is oily. But it’s because they’ve only eaten at restaurants. Home-cooked Chinese food is fairly healthy because we use less oil. Cooking this dish from home would not do it justice but it’s pretty close. Unless you rent a Cantonese restaurant and try to replicate this dish from a professional chef, I guess you’ll have to go to my uncle’s restaurant to check it out for yourself!Thousand Island Shrimp

Thousand Island Shrimp (千島蝦)

12 Shrimp

Ingredients

  • 12 Large Shrimp, peeled and deveined
  • 1/2 tsp Sesame Oil
  • 1/4 tsp Kosher Salt
  • 1/4 tsp White Pepper
  • 2 Eggs, beaten
  • 1/2 cup Cornstarch
  • 1/2 to 3/4 cup Thousand Island Dressing (If you don’t have it on hand, quick recipe below.)
  • Quick homemade Thousand Island Dressing
  • 1/2 cup mayonnaise
  • 1/4 cup ketchup
  • 1/2 cup sweet pickle relish
  • Vegetable Oil for deep frying

Preparation

  1. Preheat oil in a deep fryer or deep skillet to 375°F.
  2. Depending on which vessel you use, make sure the oil is deep enough to submerge the shrimp.
  3. Mix sesame oil, salt and pepper with the shrimp.
  4. Coat shrimp in cornstarch and shake off excess.
  5. Then coat shrimp in beaten egg.
  6. Finally, coat shrimp in cornstarch one last time.
  7. Deep fry the shrimp until golden brown for 2-3 minutes depending on the size of your shrimp.
  8. Make sure you don’t overcrowd the shrimp. Fry in batches if you’re not using a deep fryer with lots of oil.
  9. Once the shrimp are done, place them on a plate lined with paper towel to absorb excess oil.
  10. In a wok or large skillet, heat up your thousand island dressing.
  11. Put the fried shrimp in the wok and mix until all the shrimp is coated with the dressing.

Notes

Note #1: If you want the shrimp to be extra crunchy, refry them a second time before adding the sauce. However, if you decide to fry them twice, under fry the shrimp the first time.

Note #2: Depending on the size of your shrimp, put between 1/2 to 3/4 cup of the sauce. You can heat up part of the sauce and add more as needed.

https://www.memorabledishes.com/thousand-island-shrimp/

Chinese Sesame Cookie Balls
(笑口棗)

Chinese Sesame Cookie Balls

Making Chinese New Year cookies with my mom is a yearly family tradition. We make two types of cookies and Sesame Cookie Balls is one of them. When we were young, my cousins would come over and and we would make an afternoon out of it. The fun and novelty of making these cookies wore off once we were older. However, my mom would still make a small batch every year to be festive.

When the boys were old enough to sit still, we attempted to make these cookies with them. It usually started calmly and they would listen to directions. They really enjoyed shaping and rolling the balls into the sesame. Chaos would start after five minutes of the whole process. Now that the boys are older, they don’t really listen to our instructions any more. So we have to make them extra dough for them to play with while we make the cookies ourselves. But they have fun nonetheless.

My mom follows an old recipe that she copied from some magazine or somewhere. She keeps the recipe in her little notebook. However, I find the measurements are a bit off. She uses a Chinese soup spoon to measure so I’m never sure if it’s quite right. I found a few recipes online that I think are close to my mom’s original recipe. I particularly like this recipe and used it as a guide. Start making this Memorable Treat for Chinese New Year and enjoy your special memories with your family!Chinese Sesame Cookie Balls

Chinese Sesame Cookie Balls
(笑口棗)

Prep Time: 30 minutes

Cook Time: 15 minutes

Total Time: 45 minutes

Approximately 60 cookie balls

Ingredients

  • 2 cups All-Purpose Flour
  • 1 tsp Baking Powder
  • ½ tsp Baking Soda
  • 1/2 cup Granulated Sugar
  • 3 tbsp Hot Water
  • 3 tbsp Vegetable Oil
  • 1 Egg
  • 3/4 cup Raw White Sesame Seeds
  • Vegetable oil for frying

Preparation

  1. In a large bowl, mix flour, baking powder and baking soda.
  2. In a small bowl, add 3 tbsp hot water to sugar and stir until dissolved. Allow to cool slightly before adding in 3 tbsp oil, and then the egg. Mix well.
  3. Add the sugar and egg mixture to the flour and stir together. Using your hands, knead the mixture until it forms a dough. Wrap the dough with cling wrap and refrigerate for about 30 mins.
  4. Roll out the dough and cut into small pieces (approx. 1.5 cm) and form them into balls.
  5. In batches, place the balls into a sieve and dip them into cold water briefly. Shake off excess water and roll them in the sesame seeds. Roll them lightly again before frying to ensure the sesame seeds stick to the balls.
  6. Fill a large pot or pan with 2 inches of vegetable oil and heat until hot.
  7. Add the sesame cookie balls into the hot oil and deep fry at a low temperature, about 4 to 5 minutes, turning the balls in the oil as they cook.
  8. If the heat is too high, the exterior will turn brown too quickly and the inside will be soft and raw. Just when they are about to turn golden brown, remove from heat and drain. They will continue to cook further and will crisp up when cooled.
https://www.memorabledishes.com/chinese-sesame-cookie-balls/

Curry Fish Balls

Curry Fish Balls

Curry fish balls is a quintessential street food I had growing up in Hong Kong. I remember the little vendor carts that sell them on the street. For a dollar a skewer (I think that was the price), my older brother and I would buy them as snacks after school. Even the elementary school I attended had a curry fish ball station at their snack bar! As soon as a vendor opens the bubbling curry fish balls, my mouth begins to water. I always admired how fast the service was even though there were so many people lining up. Holding the skewer in one hand, tongs in another and in lightening speed, the vendor puts the fish balls one by one with quick precision onto the skewer. All the fish balls line up perfectly in the middle of the skewer squished next to each other.

Nowadays, they don’t have food carts on the streets of Hong Kong anymore. They have these food stores/stations that are opened to the outside and you can purchase your curry fish balls there along with other street foods. We can also get them at Chinese food courts and malls where I live in Canada because we live in a highly populated Chinese area. Even when my cousins come visiting from the States, they search for this simple yet delicious street food.

Curry fish balls is not something you would normally eat at home because it’s a street food. I started making curry fish balls at home because I always have leftover sauce from my Portuguese Curry Chicken. I hate that it goes to waste so I soak fish balls in my leftover curry sauce. This Memorable Dish might be simple to make but it triggers lots of childhood memories growing up and eating in Hong Kong. This is a great potluck dish too. I went to a potluck one time and a lady brought curry fish balls in a slow cooker. What a great idea!Curry Fish Balls

Curry Fish Balls

Cook Time: 20 minutes

Total Time: 20 minutes

Ingredients

  • 1 package of Fish Balls
  • 1 pack of your favourite Curry Paste or leftover curry sauce
  • Water (if you’re using curry paste)

Preparation

  1. Prepare the curry paste according to the package of the paste. You’ll need to add water to dilute it.
  2. You want the fish balls to adhere to the sauce, so the consistency shouldn’t be too thin.
  3. Bring the curry sauce to a boil and then add the fish balls.
  4. Simmer in slow heat for approximately 15-20 minutes.
https://www.memorabledishes.com/curry-fish-balls/

Show Buttons
Hide Buttons